Staring at a long, empty wall and wondering how to decorate a long wall without making it look cluttered or bare? You’re not alone.
Long walls present a unique decorating challenge. But these spaces can become the focal point of your room rather than an awkward stretch of blankness when you design them with care. The key is understanding that not every inch needs to be filled. Some walls can breathe, especially if you already have plenty going on in the room.
This piece will walk you through large blank wall ideas and practical steps to revolutionize that intimidating expanse into something intentional and beautiful. You’ll find an approach that works for your space and budget without doubt.
Understanding Your Long Wall Space
Designing around a long wall requires a different mindset than decorating standard spaces. Instead of thinking in small, isolated sections, you’re working with a continuous surface that influences the balance of the entire room. A thoughtful approach at this stage makes every design decision that follows feel more intentional and cohesive.
Why Long Walls Feel Different
Long walls create psychological and design challenges that differ from standard wall spaces. A 19-foot expanse of blankness can feel overwhelming, like staring at a bowling alley rather than a room. The scale changes your perception. Where a single piece of art works on an 8-foot wall, that same piece appears lost on a lengthy stretch.
Symmetry becomes your friend when working with extended wall spaces. The most successful compositions treat the wall as a unified design rather than isolated sections. Think of it as creating a balanced equation where visual weight distributes evenly across the length.
There’s another reason: long walls often exist in apartments, townhouses, or brownstones where structural limitations prevent windows. This amplifies the blank canvas effect. Your decor must introduce visual interest that windows would provide naturally.
Measuring Your Wall Correctly
Accurate measurements determine whether your furniture and decorative elements fit correctly. Measure both the total width and height at their widest and highest points. Ignore obstacles like doors or windows during your original measurement. You’ll account for those later during installation.
Walls spanning multiple sections require you to measure each wall’s width and add them together. This approach works when you want decor to flow from one wall to another continuously. Add 2-4 inches to your measurements to make installation easier.
A practical guideline: divide your long wall into three or five segments mentally. This prevents the monotonous look of treating it as one continuous surface. Your decor should occupy at least two-thirds of the available wall space to feel scaled appropriately.
Traffic Flow and Function Considerations
Traffic flow refers to how people guide themselves through your space, substantially influencing both functionality and ambiance. Well-planned flow creates an illusion of spaciousness, whereas poor planning leads to cramped atmospheres.
Pass-through areas demand special attention. If you have only 3 feet of clearance between your wall and furniture, choose shallow pieces like consoles or narrow benches. Bulky furniture impedes movement and creates frustration.
The room’s purpose dictates your decor intensity. A quiet bedroom tolerates different choices than a bustling living room. Art pieces can establish natural movement paths within an area, guiding visitors’ eyes and creating intuitive traffic flow. Position prominent paintings or sculptures as centerpieces that direct attention without blocking pathways.
Large Blank Wall Ideas to Consider First
Once you understand the scale and structure of your wall, the next step is deciding how you want it to function visually. A long, empty surface can become a focal point, a storage solution, or a subtle backdrop depending on the approach you choose. Exploring a few foundational design directions before committing helps you avoid costly mistakes and ensures that whatever you install feels balanced within the room.
Single Large-Scale Art
Oversized wall art ranges from 54 inches by 54 inches to 48 inches by 84 inches. One bold piece standing alone on a feature wall creates a striking focal point without distractions, especially when you have modern and minimalist interiors where a single piece defines the atmosphere.
Choosing large artwork for wall spaces allows you to emphasize architectural details like high ceilings or expansive surfaces while creating cohesion within the room. Single large paintings add structure, establish a clear focal point, and make spaces feel larger and more intentional.
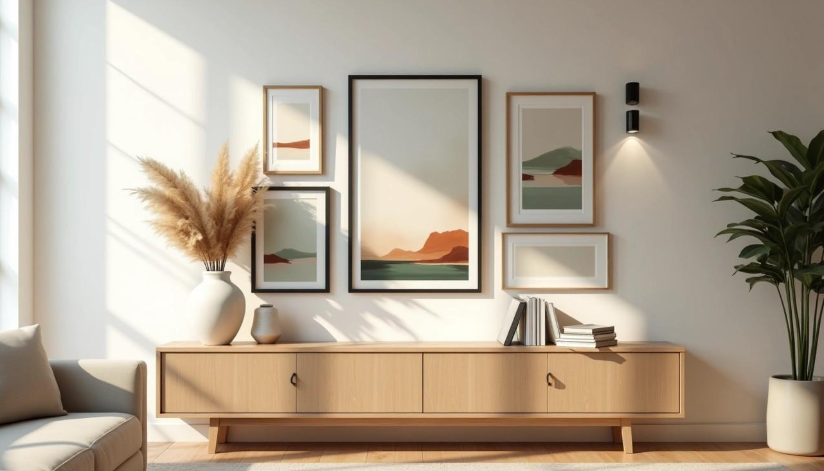
Gallery Wall Arrangements
Start by placing your biggest piece in one of the four outer corners if it’s a smaller collection, or just off-center toward the middle for larger collections. This becomes your jumping point that helps you place all other pieces. Mix vertical and horizontal orientations to keep the arrangement interesting. Space frames 2 to 3 inches apart. A 16-foot hallway wall needs frames about 4 to 6 inches apart without exact consistency.
Floor-to-Ceiling Shelving
Floor-to-ceiling bookshelves draw eyes upward and create an illusion of height and space. Modern shelving systems are adjustable or customizable units sold by modules that can be mixed and matched. Floor-to-ceiling shelves can cost anywhere from $350 to $1,400 per linear foot. These units maximize storage in small areas and bring harmony to rooms.
Architectural Elements Like Molding
Common molding types include chair rails, picture rails, wainscoting, beadboard, board-and-batten, and picture frame molding. Wall molding adds visual interest, pattern, and character without needing excess decor or shelving. Panel moldings catch light and add dimension to spaces.
Mixing Ready-Made and Custom Artwork
Gallery walls cost $300 to $400 when adding up frames and prints, yet that budget could afford one substantial statement piece. Digital prints are affordable ways to support independent artists while keeping costs down. If you want to blend personal creativity with professionally finished pieces, it can help to explore the collection first and see how different styles, themes, and formats might work together on a long wall before committing to a final layout.
How to Plan Your Long Wall Design
Planning turns large blank wall ideas into reality. You risk overspending or creating compositions that feel off-balance without a structured approach.
Step 1: Identify Your Budget
Think about your finances honestly before diving into purchases. Think about your income, expenses, and financial obligations for the project timeframe. Almost everyone tends to go over their budget when furnishing spaces, so build in wiggle room from the start. Create budget categories for materials, tools, artwork, frames, and finishing touches. Add a 10% contingency line item for unexpected costs. Tile can cost less than $10 per square foot, while custom framing runs expensive. Many choose DIY framing using discount retailers during sales to control costs.
Step 2: Determine the Wall’s Purpose
The room’s function dictates your decor intensity and material choices. Kitchen wall panels require moisture resistance, while children’s room materials must be safe and easy to clean. Selecting the right materials has a huge effect on the overall look. Accent walls work especially well in smaller spaces like laundry closets or behind home office desks and require less material while staying budget-friendly.
Step 3: Choose Your Focal Point
A focal point draws the eye and helps the room feel balanced. Select the most eye-catching feature, whether architectural like a fireplace or added elements like large mirrors. Create contrast through scale, style, or color. Everything calms down when one thing stands out more than anything else. The accent wall should be where the eye goes first upon entering a room.
Step 4: Sketch Your Layout
Create a scale elevation drawing of your long wall using quarter-inch or half-inch graph paper. Measure walls, doors, and windows, then choose a scale like 1:50 metric or 1/4 inch equals 1 foot. Draw exterior walls first and add interior elements, doors, and windows afterward. Digital tools like room planners allow you to customize solutions with modular pieces and save designs for later.
Installing and Styling Your Long Wall
Once your layout is planned and your pieces are selected, the final step is installing and styling everything so the wall feels balanced and intentional. Small technical decisions such as height, spacing, and lighting can dramatically affect how polished the finished result looks.
Keep the following guidelines in mind as you bring your long wall together:
- Hang artwork at a comfortable viewing height
Position the vertical center of your artwork around 57 to 60 inches from the floor, which aligns with average eye level and gallery standards. If hanging above furniture, keep the bottom edge about 6 to 8 inches above the surface. For gallery walls, treat the entire grouping as one unified piece and center the full arrangement rather than each frame individually. - Keep spacing between pieces consistent
Consistent spacing prevents a cluttered appearance and helps the wall feel cohesive. Most gallery arrangements work well with 2 to 3 inches between frames, while larger pieces can accommodate gaps of 3 to 6 inches. Smaller artworks tend to look best when placed closer together to maintain visual connection. - Use lighting to highlight the wall properly
Thoughtful lighting elevates the entire composition. Wall-washing techniques provide even illumination across the surface, making it easy to rotate artwork without changing fixtures. Downlights angled at roughly 30 degrees reduce glare while emphasizing texture. Track lighting offers flexibility for larger displays, while picture lights create a more intimate, gallery-like atmosphere. - Balance visual weight across the wall
Visual weight comes from size, color intensity, and texture. Larger or darker pieces naturally draw more attention, so distribute them evenly rather than clustering them in one area. Anchor the arrangement with a prominent piece near the center or slightly lower on the wall, then surround it with lighter elements to maintain balance across the full length.
Conclusion
You now have everything you need to tackle that intimidating long wall with confidence. Whether you choose a single statement piece, a curated gallery wall, or floor-to-ceiling shelving, the principles remain the same: think over your plan, measure accurately, and trust your instincts.
Start with one approach that speaks to you. If it doesn’t feel right after installation, make adjustments. Your long wall will change from an awkward expanse into a space you’re genuinely proud to show off.
 Bernardon Holmanate has opinions about art techniques and methods. Informed ones, backed by real experience — but opinions nonetheless, and they doesn't try to disguise them as neutral observation. They thinks a lot of what gets written about Art Techniques and Methods, Trends in Contemporary Art, Exhibition Announcements and Reviews is either too cautious to be useful or too confident to be credible, and they's work tends to sit deliberately in the space between those two failure modes.
Reading Bernardon's pieces, you get the sense of someone who has thought about this stuff seriously and arrived at actual conclusions — not just collected a range of perspectives and declined to pick one. That can be uncomfortable when they lands on something you disagree with. It's also why the writing is worth engaging with. Bernardon isn't interested in telling people what they want to hear. They is interested in telling them what they actually thinks, with enough reasoning behind it that you can push back if you want to. That kind of intellectual honesty is rarer than it should be.
What Bernardon is best at is the moment when a familiar topic reveals something unexpected — when the conventional wisdom turns out to be slightly off, or when a small shift in framing changes everything. They finds those moments consistently, which is why they's work tends to generate real discussion rather than just passive agreement.
Bernardon Holmanate has opinions about art techniques and methods. Informed ones, backed by real experience — but opinions nonetheless, and they doesn't try to disguise them as neutral observation. They thinks a lot of what gets written about Art Techniques and Methods, Trends in Contemporary Art, Exhibition Announcements and Reviews is either too cautious to be useful or too confident to be credible, and they's work tends to sit deliberately in the space between those two failure modes.
Reading Bernardon's pieces, you get the sense of someone who has thought about this stuff seriously and arrived at actual conclusions — not just collected a range of perspectives and declined to pick one. That can be uncomfortable when they lands on something you disagree with. It's also why the writing is worth engaging with. Bernardon isn't interested in telling people what they want to hear. They is interested in telling them what they actually thinks, with enough reasoning behind it that you can push back if you want to. That kind of intellectual honesty is rarer than it should be.
What Bernardon is best at is the moment when a familiar topic reveals something unexpected — when the conventional wisdom turns out to be slightly off, or when a small shift in framing changes everything. They finds those moments consistently, which is why they's work tends to generate real discussion rather than just passive agreement.